Best Downspout Diverters
There is a lot of junk out there being used for downspout diverters. I have sifted through the mess of these diverters and can assure you that it is well worth pay the extra few dollars to get a quality piece of equipment for your rain collection system.
I think it’s safe to say you already know what a downspout diverter is, since you’ve found this guide but just in case you didn’t, downspout diverters are used in rain collection systems to “catch” the rain falling from your roof and gutter and guiding it to your rain barrel.
Many of these products have great designs incorporating screens, overflow drains, tubing and extensions and more. Depending on how creative you want to be with your system, you can build some great rain catchment systems.
Let’s get right to it.

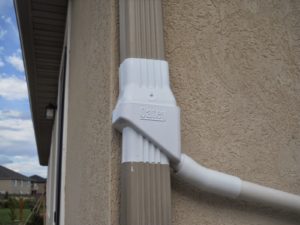
Based on extensive research and reviews, we have determined your best option for standard sized downspouts, is the Oatey 14209 Mystic Rainwater Collection System. Check Prices On Amazon
This product fits standard 2” x 3” residential downspouts. The UV resistant polyethylene construction holds up well to the most brutal climates and blends in with white gutters. It is paintable if you have other color gutters, but white is the only color offered by Oatey.
The reputable Oatey brand has put in a substantial amount of effort to design this product that can be had for under $20. The downspout diverter comes with a 4 ft hose that gives you flexibility for connecting a rain barrel that may be around the corner or a few feet away. The provided plug will allow you to easily disconnect the hose and winterize your system.
For heavy downpours, this gutter diverter has an overflow mechanism that sends excess water (after your rain barrel is full) back into the gutter to be emptied as it typically would. The seamless install is as easy as it gets for downspout diverters and is the least intrusive of all options.
One major drawback with the product is the lack of leaf screen. However, if you screen your gutters or have a screen over the top of your downspout it’s no problem.
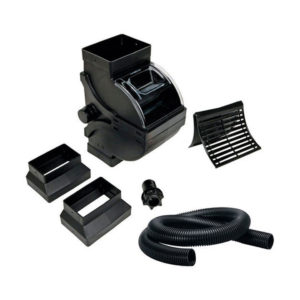
For those of you that need a screen to filter debris from your rainwater, we recommend the Friskars Rain Barrel DiverterPro Kit. This diverter is a bit more complex but offers much more flexibility. It is more expensive than its Oatey counterpart, but it has many more features.

First and foremost, if your downspouts are sized 3” x 4” this is your best option. While it can fit both 2” x 3” and 3” x 4” downspouts, it clearly works better with the larger downspouts than it does 2” x 3” as many people have reported problems with fitting and leaks – it’s the most common complaint with this product.
However if you have 3” x 4” downspouts, there are very few complaints. The bottom of the product fits inside the lower downspout to ensure water doesn’t leak out everywhere. In addition to all of the features in the Oatey diverter, this Friskars device contains an internal leaf screen that is removable to be cleaned as necessary.
It comes with a plug for winterizing and a cheap plastic hose to connect to your rain barrel. The hose is not easily replaced with anything more durable due to the adapters used to connect the hose.
Because of the screen and adapters to fit the diverter to both standard size downspouts, this product is bulky and more of an eyesore than the Oatey, which is why we ranked it in second place despite the additional features.
Guide to Rain Catchment System Downspout Diverters
There are a multitude of these mechanisms on the market with a large variety of designs and systems. Most of them are absolute junk, which is why we have created this guide to help you find the best product for your needs.
There are two main categories of downspout diverters: open system and closed system rainwater collectors.
A closed system rainwater collector means your barrel is sealed everywhere, with two thru holes. These two thru holes are your rainwater inflow (coming from the diverter to the barrel) and your outflow (hose to your lawn/garden). These are really what downspout diverters are made for, as when the barrel fills up, rainwater flows back through the inflow hose and back to the gutter to be drained.
An open system is essentially any rainwater barrel that has an an unsealed thru hole. As the rain barrel fills to capacity, excess water just spills over onto the ground. This system is perfectly fine, if that’s how you want to design your rainwater catchment system but makes the downspout diverter irrelevant to your needs.
If you plan on building an open system, simply replace your downspout with one that empties directly into your barrel.
Before we delve into the guide, I need to explain first flush diverters like this one. First flush diverters are different from downspout diverters in that they do not “divert” rainwater from a typical water source (like your downspout) to your rain barrel. Instead, they divert the first few gallons or so, depending on the size, and remove it from entering the water containment vessel. While theoretically, these do remove contaminants from your roof after a dry period but unless you plan on drinking this rainwater (not recommended for DIYers!!) it doesn’t matter and adds an extra piece of equipment you don’t really need.
Their effectiveness is also questionable, since it works with a ball and seat mechanism which is not 100% efficient. It would certainly remove some of the contaminants, however.
Another issue is how to connect them to your system. Most are designed for PVC pipe, not residential gutter systems.
For those reasons, I do not recommend their use for your rainwater catchment systems unless you have a specialized project you are designing with professional help. For more information on them you can check it out here.
How it Works
The designs for downspout diverters are plentiful. You can find homemade diverters out of PVC or a knot of gutter elbows used to create the same effect. While these inventive ideas can work, they are quite ugly and for the small investment, it’s a much better idea to buy something that is easy to install and blends in with the gutter system you already have.
The most common design for these diverters are essentially upside-down funnels. The outer area of the diverter collects rainwater to be drained through the hose into your barrel. If the barrel is full or you are experiencing a substantial amount of rain, the excess water will flow through the top (or bottom?) of the funnel to be drained back through the gutter.
The funnel could be a cylinder or square or any shape really. The important concept is once the water level inside of the diverter reaches a certain point, it self drains into the lower downspout.
Because this design is confined to a small space and keeps it as simple as possible, diverters are not 100% efficient. A 100% efficient diverter is not a diverter at all – all you would need to do is place your barrel underneath an unaltered downspout or re-route the downspout with an elbow.
If you are going to use a diverter, you must realize they may only be 60 – 80 % efficient, meaning it will only catch 60 – 80% of the rainfall. These diverters do a great job but during heavy storms, the rainwater volume is too large and it causes overflow back down the downspout. With a gentle rain, these are perfect for most rain catchment systems.
Features
Many gutters are now being fitted with screens or are being designed to catch water and allowing debris to fall off the roof to the ground. However this is a relatively new concept that is just now starting to catch on.

If you haven’t quite jumped on the bandwagon, like myself, you need to find a way to screen your rainwater. You can install a screen across your entire gutter if you wanted but it is much easier to install the screen where the gutter meets the downspout. The drawback to doing this is it will create a major blockage over time and considerably slow down your gutters’ ability to drain. You will still be required to climb up to the roof and clean your gutters.
If you have an open system rainwater collector, the screen can be located on the barrel itself, although this is not recommended.
Alternatively, you can purchase a downspout diverter with a built in screen. If you go this route, make sure you have access to the screen so you can easily clean and replace it. Some diverters have a panel that can be removed to access a screen, while others require take apart the entire device.
One aspect many people overlook when buying a downspout diverter is how they plan to connect it to their rain barrel. Some systems come with a hose that can drain the rainwater to your barrel, but not all of them do. If not, you need to plan how you are going to do it with the adapters on the diverter.
If you like in a colder climate, buying a diverter with a plug is an absolute must. During winter when freezing temperatures arrive, you will need to drain your rain catchment system and put a plug in the diverter to prevent any rainwater (or melted snow) from refilling the rain barrel. Most rain barrel diverters are designed for permanent installation, so a plug is a necessity. If your diverter does not come with a plug, you need to make sure you have a plan in place for winter.
Installation
Naturally, if you plan on using a downspout diverter, you will be expected to cut your downspout for installation. If you are not prepared to do this, then seek other options. If you are capable of doing so, you can make short work if it with a sawzall or a reciprocating saw. If neither of these are available, you can always revert back to the trusty hacksaw or tin snips.
Stop! Before you start cutting, you need to mark the location on your downspout for install. Remember, these are gravity fed systems. You need to make sure the diverter is at least level with the inflow of the rain barrel, if not higher.
You want the rainwater to flow into the barrel right? Install it above the inflow of the barrel. I cannot stress this enough. The directions that come with your particular diverter may indicate for you to make it level with or a certain height above the rain barrel. Follow their instructions.
Before you start the install, it’s a good idea to get some more downspout straps or brackets, whichever you prefer. Your downspout is going to be cut in half. It will definitely need more mounting support on the bottom half but also on the top half to prevent sagging. Buy whatever you need, with screws, nails or rivets before you start.
Also, it’s a good idea to have a tube of caulk ready to go just in case. Unless you purchase our top rated diverter, there is a good chance you will run into some leaks. Silicone caulk can be used to patch the cracks to keep water in your downspout or rain barrel.
Conclusion
It’s a fifteen minute job. Choose a diverter that fits your gutter and you can make quick work of it.
You can certainly buy cheap and design a diverter yourself but this is one part for your rainwater catchment system I strongly suggest you purchase. There are cheap, effective options out there and there are some diverters that have all the features you could possibly want. Just don’t be that guy that builds one out of PVC and duct tape.

I like the self-cleaning leaf screen feature of the Fiskars diverter, but I find it quite inefficient at catching rainwater, particularly during light rainfalls, as:
1) much of the water coming down the downspout either bounces off the leaf screen, rather than passing through it, or drips off the front edge of the downspout and misses the leaf screen entirely, thereby completely bypassing the water capture chamber; and
2) the water capture chamber itself is not watertight (the plastic insert that creates the chamber just rests on a plastic ledge with no seal of any kind), so water that does make it into the chamber continually leaks out past the unsealed edges of the chamber making it hard during light rains for enough water to accumulate in the chamber to reach the outflow hole that leads to the rain barrel. I suppose I could caulk the insert in place, but I like the fact that I can easily winterize the diverter simply by removing the insert, rather than having to disconnect the outflow hose and then cap the outflow hole.
I would like to see the design of the Fiskars diverter improved to address these two issues, or someone else come up with a design for a diverter that is both efficient at diverting rain water, including during light rains, and includes a self-cleaning leaf screen.
I totally agree with DougR review of the first diverter.
I had to adjust that pesky screen many times to fit it correctly.
Also it isn’t very efficient on light rain or showers.
Can anyone tell me how the Oatey diverter compares in these situations?
I had to convert my downspouts from 3×4 to 4×5. Are there any downspout catchers on the market to fit the larger size? I’m not having luck finding.
I REALLY like the RainGrid seasonal diverter and filter system that comes with their 132G rain barrel. the design is incredibly simple yet thoroughly effective. A box with a cylinder that feeds into the side of their rain barrel. Also has a remarkably efficient 210 micron filter bag that catches EVERYTHING but still allows inflow. It is winter proof by simply turning a dial that turns the cylinder to bypass the inflow into the cylinder. Brilliant design. Unfortunately most rain barrels don’t have side openings but you could easily retrofit your rain barrel to fit. Even better, the diverter acts as an overflow port as well. When the barrel is full it backflows into the diverter and passively overflows by design. Incredibly brilliant. RainGrid, when are you going to make a divrter that fits onto a downspout? Come on….
Where can I order this?